Glam Nightstand DIY

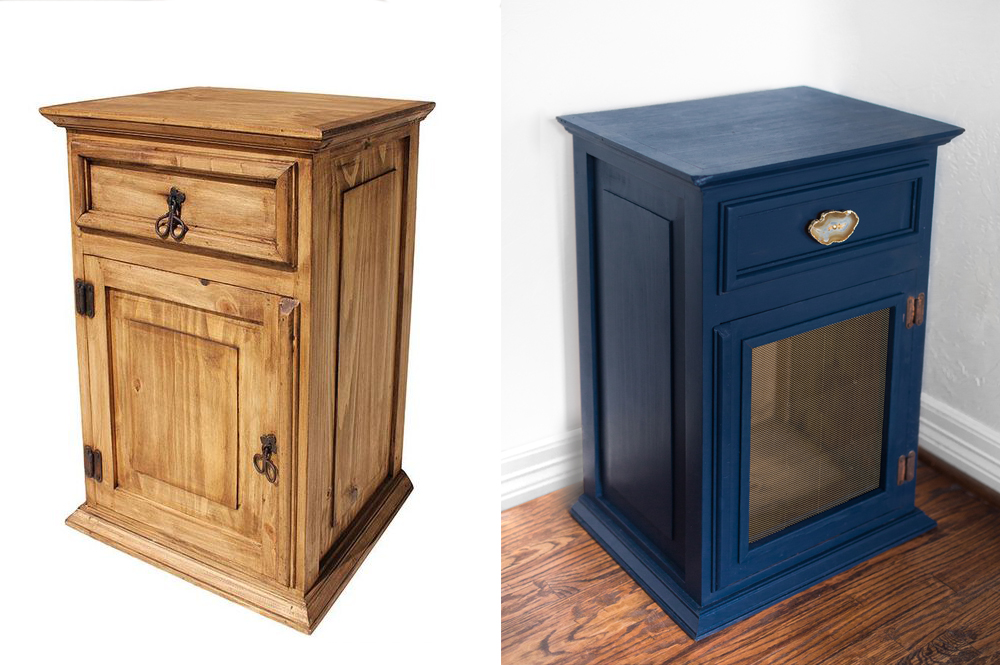
If there’s one thing you need to know about me, it’s that I LOVE to repurpose. I would much rather buy a cheap, used piece of furniture that I can transform than spend hundreds on something that “will work for now.” My rationale was no different when it came to finding nightstands for our new master bedroom. I looked and looked online to find the perfect pieces to complement our midcentury style bed frame and palm-print wallpaper. But with a self-imposed max budget of $100, my search came no avail. So, my next and obvious step was to scour Craigslist for the perfect DIY project. Within days, I had found the perfect pair of nightstands… candle burnt, dog chewed, and all. $50 and a drive to Edmond later, and I was now the owner of these beauties.
Turns out this particular style is actually fairly common. I have seen them on Austin and Tulsa Craigslists and they even popped up on a Google search as soon as I typed in “pine nightstands.” So, if you happen to either own or come across nightstands similar to these, you may want to consider a little glam update.
Supplies
- Handheld Jigsaw
- Electric Hand Sander
- Corner Trim OR Flat Trim (1/2″ basswood)
- Wire Mesh (also available at Hobby Lobby)
- Valspar Paint in Royal Navy
- 18K Gold Krylon Premium Spray Paint
- Epoxy
- New Hardware
Directions
My first step in this project was to remove the old, existing hardware. These particular pulls had been staple-anchored in, so dislodging them in itself was time intensive. After they had been disposed of, the real fun began.
My vision was to make the doors feel more open and less clunky. So, following the outline of the door’s frame, I carefully cut out the center panel with my jigsaw. For my nightstands, I went ahead and left the doors attached because the hinges were going to be way too difficult to remove without causing damage. Detaching the doors would have actually made this step much easier. If you have access to a sander (which I fortunately do), you don’t need to be too exact. Just be patient with yourself while cutting.
The next step is actually up to you. For my project, I chose to line the now-opened door frame with corner trim from Lowe’s. I love the way that it looks and really appreciate that I was able to install my mesh to the backside of the trim. BUT, cutting the 45 degree angles precisely and getting the pieces to line up is very tricky. You may be better off applying the mesh to the outside of the door and gluing a flat trim on top. (Obviously, you’ll want to paint the trim separately for this option.) OR forget the trim altogether and staple/epoxy the mesh to the backside of the door. I suggest epoxy for any trim attachments.
Once you have a smooth framed outline, vacuum/clean the sawdust and wipe down your furniture. After that you are ready for paint! Choose a color that fits your space. We needed a little more color in our bedroom so I choose a super dark navy. Whites, creams and grays will always be safe choices too. Apply two coats for overall coverage and give it time to dry. In between coats you can spray down your mesh with good quality gold spray paint. I used Krylon Premium from Michael’s.
The last tasks are what really glam up your nightstands. Cut down your gold mesh with tin snips and apply it using a clear epoxy. I chose this glue simply for ease and bonding strength with metals. And finally, select some fabulous new hardware, like these from Anthropologie! Had I not chosen such expensive drawer pulls, this project altogether would have been WAY less than $100. But, I couldn’t resist the agate. It gets me EVERY. TIME.
I would love to hear your thoughts or if you might consider using any of these techniques on your next furniture project! I’m always here for any DIY related questions.